Resizing images using picResize
ezguide
easy to follow step by step guides
easy to follow step by step guides
Many photos or images start out too big for a typical website page, so resizing is a common requirement. This handy website has become very popular as it does just that job very well, and you can specify your new image size exactly.
Your website image library features the option to resize an image as you upload it, and gives several options for the image width that you can choose. Sometimes though, you might want a slightly different size, and that's where pic resize can be very helpful. Add in the ability to crop photos, (just showing part of the original image), and it's easy to see why we think it's very useful indeed.
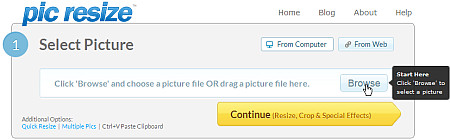
![]() pic resize is in fact a very clever (and free) website and this guide shows you step-by-step how to use it. Please note that the pic resize website does change a little cosmetically from time to time, and it's not under our control. So our screenshots below may not always be exactly what you see on the pic resize website. However, the way it works has stayed the same for several years.
pic resize is in fact a very clever (and free) website and this guide shows you step-by-step how to use it. Please note that the pic resize website does change a little cosmetically from time to time, and it's not under our control. So our screenshots below may not always be exactly what you see on the pic resize website. However, the way it works has stayed the same for several years.
Important: PicResize is a free web based system supported by adverts. There is no need to download anything, but you may well see download buttons in banners. Ignore these, as they are just adverts.
Here are the 6 simple steps to resizing your picture and using it on your website.
(a) Click this link to the website http://picresize.com
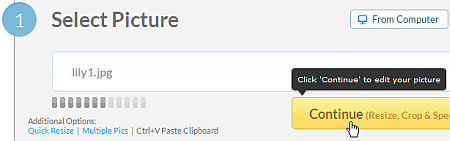
(b) You will see a simple screen similar to that shown below. Step (1) is to choose your photo or image, so click BROWSE and select your image - it might be on your Desktop or in My Pictures.
Once you've selected the image you want to use, ignore the Continue button for now, and instead click the little Quick Resize link on the left, as shown below...

...and a (2) option appears below.
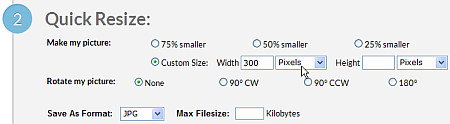
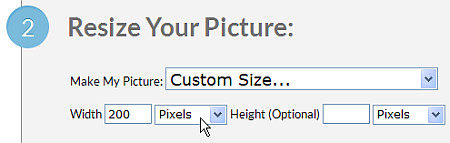
(c). Select the Custom size option, by clicking in the little circle just left of the Custom size words. Then let's say we are resizing your image to 300 pixels wide (though don't forget that your website image library features this as a size option - 300 pixels is just an example size for this guide). You then enter 300 along side it against "Width", then if necessary change the pull-down from Percent to Pixels. Just leave the Height box blank (this isn't needed), and the screen should then look like the one above.
Please note that a good size is typically between 200 and 400 pixels wide with a maximum of 440 pixels (for most of our designs). Images that are wider than this are likely to corrupt the design resulting in display problems.
(d) All you need to do now is click the big "I'm Done, Quick Resize My Picture!" button just below. You may need to wait a while as your image is uploaded and resized, but soon you should see a screen something like this...
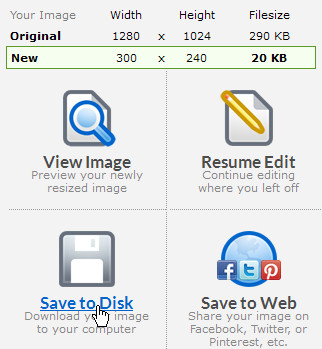
(e) Just click the link Save to Disk, and store your resized image straight onto your own computer. The resized image will have a filename starting with rsz, unless you change it while saving it onto your computer. (NB Ignore any big "Download" button that might appear in the space to the right of the above options - this space is reserved for adverts)
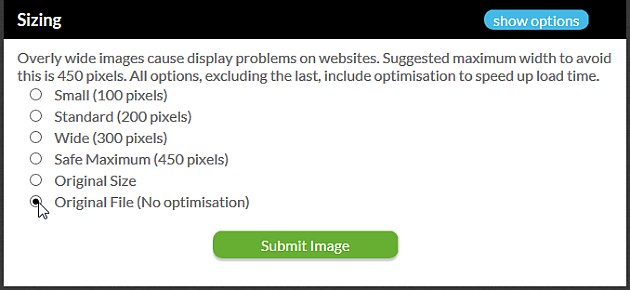
(f) Finally, you just need to import your resized image into your website's image library before you can display it on your website. However because you've already resized it to the size you want, and pic resize optimises the image for you, you don't need to resize or optimise it again. So when you upload your resized image, just choose Original File (No web optimisation)
(You may need to click show options to see all the size options...

Then pick Original File (No web optimisation), and Submit Image ...
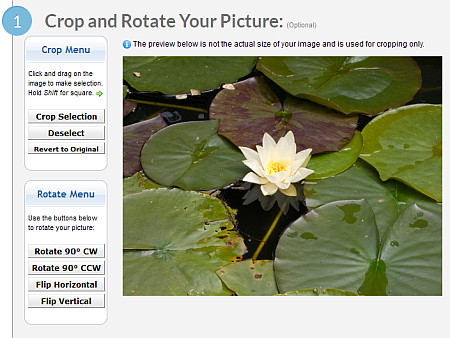
There's one more really useful feature in PicResize that allows you to get a bit more creative, and that's cropping pictures down. By that we mean getting rid of a poor surround, or just choosing one part of the picture to use. For example, you might have a picture like this, but you just want the picture to show the flower...

This is where cropping comes in, and PicResize can help you out.
To use this option, when you go into the Pic Resize website, instead of clicking the Quick Resize option, first browse for your photo, and then click Continue . (Some stripes will appear while your photo loads up, which may take some time if your photo is straight from your camera or phone)
A screen starting like this will then appear.
With your mouse, just left-click and drag on the picture to make the rectangle you want to keep - the outside of this area will be discarded. You'll see something like this once you've made your selection...
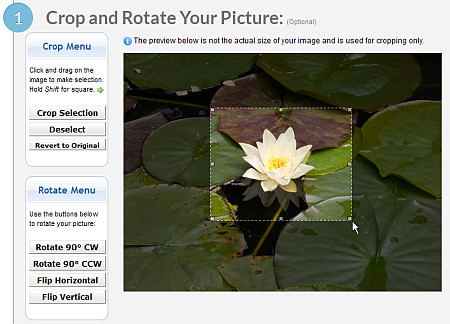
If you're not happy with the rectangle's position, you can adjust it as you would an image in a Word document, or you can click Reset Picture to start again.
Once you've outlined what you want to keep, click the Crop Selection button, and you'll get something like this...

You can then scroll down the screen and resize this crop to a suitable size for your website. However, step (2) looks a bit different, and you'll need to click the down arrow and select Custom size from the "Make My Picture:" dropdown menu...
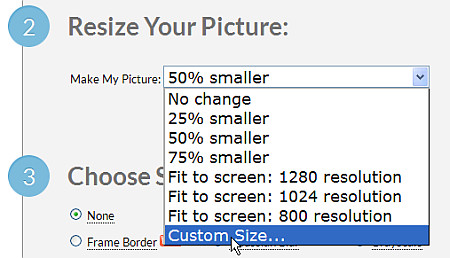
You'll then be able to specify an exact pixel size as described in "Basic Resizing", again leaving the height as blank...
Finally click the I'm Done, Resize My Picture! button, and you only need to follow steps (e) and (f) from the Basic Resizing section above, to be able to use it on your website.
This technique is particularly useful for portraits, where there's too much background, and you want the picture to just show you.