Internal Links
ezguide
easy to follow step by step guides
easy to follow step by step guides
This article explains how to create links within your website to other parts of your website, such as a link to your customer testimonials page, or maybe a link to the bottom of your contact details page where someone would see your postal address
Before attempting these techniques, it is strongly advised that you familiarise yourself with the standard linknotes method for external links to other websites. See the Help Guide section D1, and complete The Yahoo Example shown there to ensure you understand how they work
Once you are happy with putting in external links to other websites, you are ready to get to grips with these internal links.
In the Contents below, options 1, 2 and 3 are straightforward, so you can try them straight away. Option 4 needs you to have some Storyboard Paragraphs in place, so for these you might first need to read our EZ Guide to the Paragraph Control Tool.
Now that you understand the basics about linknotes (after doing the Yahoo example in the Help Guide section D1), instead of linking to an external website (e.g. www.something.com), you may want to link to another page of your own website.
There are 3 Steps to this:-
Here's an example. Let's say that we want a clickable link on our Home page, which will take us from the Home page to the Our Services page. The clickable link itself will be on the Home page, so...
Step 1 is to go into your administration area, and click Home to start editing the home page.
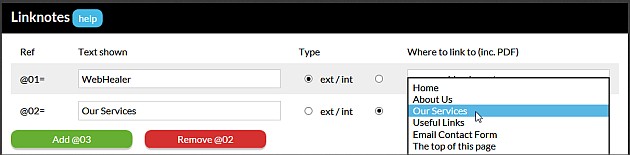
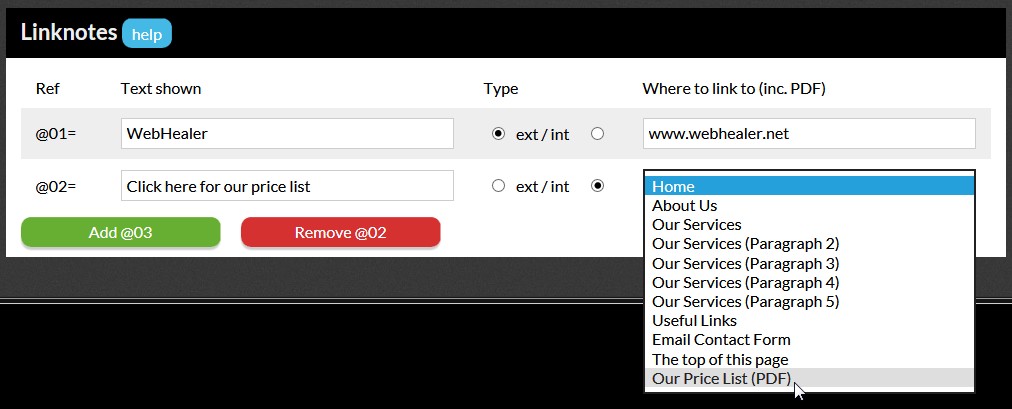
Step 2 is to create the Linknote, and Figure 1 below shows how this would look if you want the link to appear in your home page text as Our Services.
Now you need to choose the Type of link you want, which is int for Internal. So click the radio button as shown in Figure 1 above...
"But I don't see these ext / int options!" If you haven't got these options, click here for guidance on how to enable them.
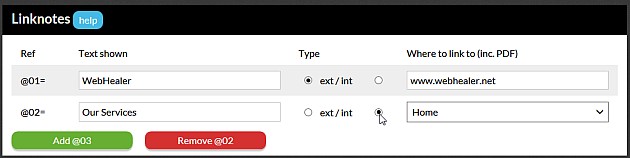
Assuming you have now clicked int, you'll now see that the Where to link to box changes to a drop-down list. Click on the blue down arrow at the right hand side to see the list, which will contain all the available internal links that you can make at the current time. Now you can choose where you want this link to go. So in our example, we just choose the Our Services page.
Step 3 is to position your link where you want it on your page, so just type the Linknote Ref, in this case @02, into the Text Displayed box in the appropriate place...

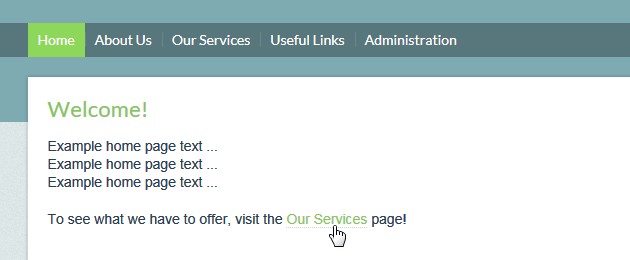
Finally, click Save Changes, and you'll have created an internal link from the Home page to the Our Services page. The link will look like this on the Home page of the website...
Please note that if you don't get the ext / int and Where to link to drop down list, you might not yet have been upgraded to our new editor. The new editor is something that was introduced in early 2010 as part of the development that came with our Email Contact Form, and a quick way for you to enable the new editor is to switch on the Email Contact Form. You can then switch it off again if you like, but the editor upgrade will stay. To do this, just follow these steps:-
If you don't actually want an Email Contact Form right now, please just switch on the Email Contact Form anyway as above, then follow these further steps...
The new editor will remain enabled when you do this, allowing you to set up internal links as described above, even though you don't now have the Email Contact Form switched on.
As you can see in Figure 2, The top of this page is one of the options in the drop-down list. So to create this kind of link, just make sure that the Text shown in your Linknote is something like Back to top or perhaps Top of Page.
Once again, the option is shown in Figure 2, in the drop-down list, so just make sure that the Text shown is something like Click here to email me.
You can set up links to any of your storyboard paragraphs, on any of your website pages as well. This is how we make links to different parts of a page. To see how to set up these storyboard paragraphs, see our EZ Guide to the Paragraph Control Tool.
Example
Lets say that you have an Our Services page, which is already divided into 5 paragraphs. The 4th paragraph is about your Online Services, and you want to promote these, so you might want to set up a link on your Home page, which goes straight to the Online Services section of the Our Services page.
To do this, you would edit your Home page and put in the linknote and text displayed as below. Now when you click the int button, the Where to link to dropdown list will show all the pages and paragraphs that you can link to on your whole website.... (Click the example below for a larger version in a new window)
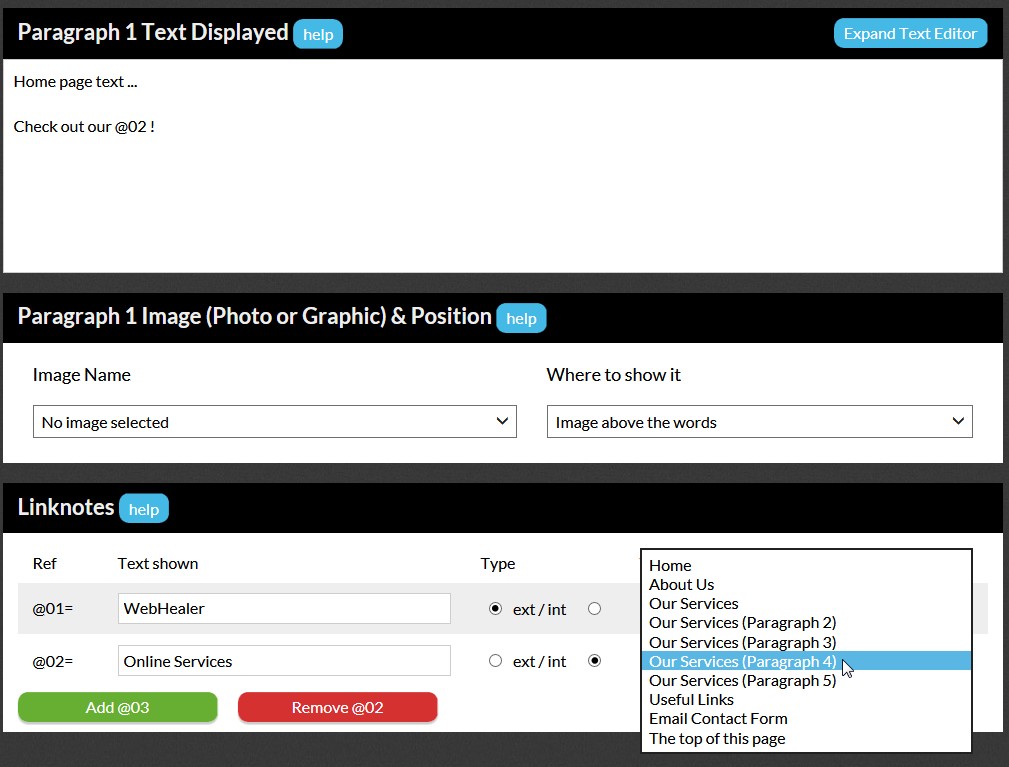
Here, you would click on Our Services (Paragraph 4), click Save Changes, and you're done!
The home page link that you've set up will look something like this:-

Clicking the link as shown will take a visitor straight to the Online Services paragraph, part way down your Our Services page.
This technique can also be used to link to different parts of the same page, provided the page is already divided into paragraphs. This can be very useful for a Frequently Asked Questions page which runs to several screens, for example. Here, you could put each question in its own paragraph, and all the links to the various questions at the top of the page. Also, each paragaph could end with a "Top of Page" link, to make it easier for a visitor to navigate around a long FAQ page.
This allows you to make a text link to a PDF that you've already uploaded into your website image library. For details on how to do the upload, see section B1 of the Help Guide.
Once the PDF is in the library, making a link to it is very simple. Just add a new linknote, click the int button, and you'll see the Where to link to dropdown includes any PDFs you already have in your website image library. (Click for a larger version in a new window)
Just put whatever you want in the linknote's Text Shown box, and you can then put the link anywhere in your page's content.